

So come on out! If it’s too hot for hiking, it’s air conditioned in the gallery. Come by and hang out in the Gallery library. Check out our unique book selection, or try your hand at playing the piano! We can provide you with some iced drinks made with mint and herbs from the garden. Our self-guided nature trails are on the web, or you can pick up the guides at the gallery. We have bamboo hiking poles available as loaners, or you can take your favorite home with you for a $5 donation to SVI.

Our newest tiles were begun this spring, using the beautiful blooms of the dogwoods and other spring flowers. Since the period of dogwood blooming is so short, we eventually had to drive up Daus Mountain to find trees that still had flowers. This involved: wading through roadside trash across barbed wire; balancing on the edge of a ravine in dense thorny blackberries and using a pole pruner; encountering very healthy poison ivy and dodging snakes; and washing off seed ticks on our return. But as you can see, it was a successful trip. This was an unusual trip, as most of the plants on the tiles come from our own forest, fields, and gardens. There are plenty of plants to find here, with 300 acres of forest, permaculture gardens, and the seasonal high tunnel greenhouse, all protected by the Land Trust for Tennessee through a conservation easement. Each morning I walk along our miles of trails, collecting the most perfect plants and flowers as they appear each season.

So why has it taken so long to complete the tiles? Here is why! I first roll out the clay and determine the spacing and design of the plants. In the case of the dogwoods, each bloom is carefully selected and placed. I then press the center of the bloom into the clay, and next turn the bloom over to impress the petals (note to botanists: I know they aren’t really petals, but bracts). The leaves and stems are carefully added and pressed in. The tile is dried a couple of days between pieces of wall board we collect from building dumpsters. Then I remove some of the thicker stems to prevent cracking and touch up any stray marks, turn the tiles, and paint the edges with Bravo floor wax to slow drying and cracking. Back to the wall board. The tiles are all stacked and covered with plastic for about 2-3 weeks. When they reach leather hard (not dry, but stiff) I check them again.
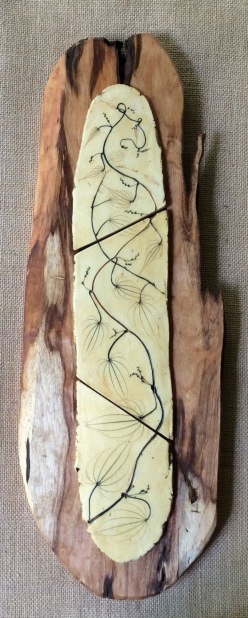
At this time I may cut the larger tiles into sections. This prevents warping and cracks in the larger and more complex pieces during firing. The cutting process takes several days–I choose the most artistic place for the cut, then begin the cut one day, and complete the cut in several sessions after more drying. Finally, I uncover the tiles and allow the drying to complete under fans and ac. I remove some of the plant parts from the clay and leave some to burn out in the kiln. Once they are completely dry, we place them in the kiln (Johnny’s job), on top of creek sand to allow for movement and prevent cracking. Each tile is placed separately. The kiln is pre-heated then slow fired up to about 1800 degrees, then slow cooled. This takes about 24 hours. Tiles are removed when cool and scrubbed to remove the ashes of the remaining plant material (J’s job). I make a mixture of various natural mineral oxides, mainly iron and copper, with water and fine clays and paint this onto the tiles. I wipe off the excess with sponges and cloths, leaving the oxides to emphasize the patterns of the plants. This is a LOT harder than it sounds! I end up spending some late nights listening to Hoopla detective stories to finish this.
Once I am happy with the stains, the tiles are ready to go back in the kiln. The kiln (electric for this kind of work) is slowly heated to about 2200 degrees and then slow cooled, and opened when the temp reaches about 100 degrees. This takes about 24 hours from start to finish. We open the kiln to see if Santa has brought toys or coal…….Occasionally we have a crack or warping that means we can’t use the tile–very sad.


Next, we are ready to mount the tiles. Johnny looks them over, then goes to the sawmill to find artistic and unique wood that suits each tile. All the wood comes from dead or fallen trees on our land. The gallery furniture is made from a tulip poplar that fell on one of our houses! In the case of the spring dogwood tiles, Johnny found a gorgeous piece of old wild cherry that came from a huge dead tree up near our bluffs. The center of the log provided beautiful wood for making into furniture, and the intricate patterns of the outside slabs were perfect for the dogwoods! Johnny cuts the boards at the sawmill, planes them in the shop, and carefully selects the best piece for each individual tile. He lays out the pattern and cuts out the piece. He then finishes each piece using a sander and carving tools. Next he glues on each tile in the exact position he has designed. He makes hangers from copper wire and screws them onto the back, balancing the tile perfectly. He finishes the wood by rubbing in 2 coats of Danish Oil, from Highlands Hardware in Atlanta. I print off labels for each tile, describing the plant and, often, its importance. Johnny uses decoupage glue to attach the labels. As the final touch, he labels the type of wood using a drawing pen.

Now the tile is ready to be displayed! So come and see the final result–and take one home to add a part of nature to your walls!


One thought on “Gallery and Trails Open this Weekend, August 13-14 with New Art!”